Josefa, can I ask one more question, is it possible to kill hairs permanently with one pulse using insulated probe working on solo anagen hairs if hairs release easily? (making sure, of course, the depth of insertion is correct)
Of course! I think you would need more than 1 millisecond, but of course this is possible with one hundredth of a second.
Can I ask what is your reluctance to apply more than one pulse? Is it because of the pain?
I just want to understand the effectiveness of one pulse. And, of course, one pulse is faster and easier than two pulses if all hairs in anagen.
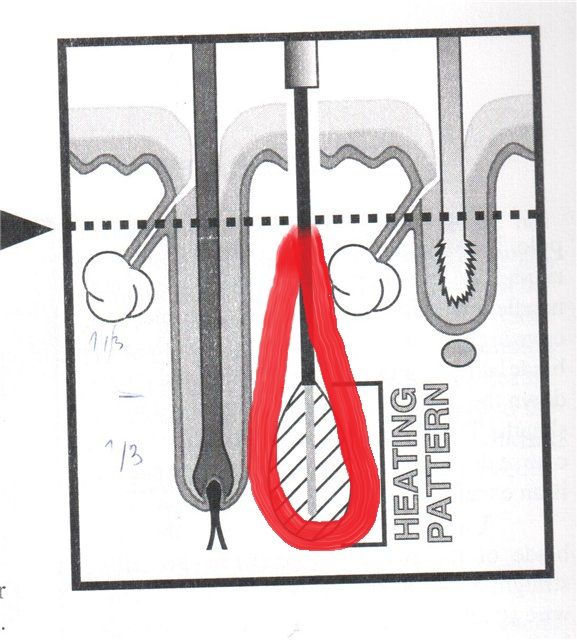
But what about this picture about insulated needle from Michael Bono “Treatment Strategy for Electrology.”

According to this picture, insulated probe covers only 1/3 of the follicle, but we need 2/3.
Yes, and this is why many of us preferred to use a bare needle for Thermolysis before test the IBP and verify that J. Laurier designed a suitable size for each hair type.
Do not forget that he designed a probe to work “only anagen”. And he did so well that work perfectly or even better in telogen.
The conductivity is higher in anagen, therefore heating pattern with the same intensity and time is also increased.
If the insertion is shallower and a pulse is sufficient to deactivate the hair from the anchoring zone, then probably the treatment will be successful, reads the thread “Papilla…anagen…telogen”. You’d only fail if you’re working in late telogen and at that point, a new anagen hair is formed in the same follicle.
So, the “bare” tip of insulated needle, which cover 1/3 of the follicle is enough to kill the hair in anagen even without displacement because the heat still raise a little above the insulation?
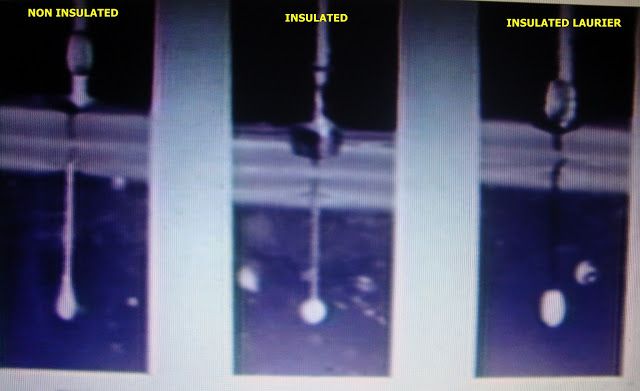
Please keep in mind that this explanation assumes that the insulations used are opaque to radio frequency energy, most are not.
This can be demonstrated by observing the radiation patterns in egg white produced by the various brands of insulated needles vs. the IBP.
Notice how Mr. Bono’s illustration matches the actual photograph on our web page. Michael, if I could ask, the next time you are afforded the opportunity to meet with live follicles under high power magnification. Could you choose the appropriate size IBP for the hair in question were you tasked to remove it and compare it’s exposed tip length to what your desired “kill zone” would be. I’m sure your observations and opinion would be very pertinent to this discussion.
Jossie, your use of the illustration is PERFECT! Indeed, this is how most thermolysis folks ARE using the IB probes. I think it’s a terrific approach: with full understanding of what needs to be done.
I’ve done a specific drawing to show this use of the Laurier probe (some time ago) … I just have to look around to find it! But yours is perfect!
The “genius” of the Lucy Peter’s technique (with Laurier probe) is that she was/is actually “fitting the hair follicle to the needle itself!” She did this by having the client periodically shave … thus, only working on early-anagen hairs. Hers is not my strategy, but I think it’s a very good strategy that worked brilliantly. (I met Lucy at a dermatology convention … she was a “hoot!” We laughed a lot.)
I remember how other electrologists were furious at Lucy because of her advertising (even the AEA complained) … I told them all to “shut up” because she was doing ALL OF US a big favor! When somebody advertises, they help all of us by popularizing the profession. A little “puffing?” … So what? It’s what motivates people! (Most of us are too conservative in our advertising.)
“When the tide rises, all boats float higher!”
Hi Mike … I have already done that.* Your “sizing” is “right on the money!” Especially if people do the “up down” technique. (At the moment, I don’t remember the exact size I fiddled with, but it was just about right.)
*I can’t tell you how many times Dr. Perkins would say: “Okay Bono, get your behind back in here and stop ‘fiddling’!”
Can I quote one more from Michael book?
“Over the years, I have observed hundreds of beginning electrologists. Nearly all make the same mistakes……After some time they discover that a shallow insertion give a speedier release. Their insertions then become increasingly shallow. Soon, they find that inserting half-way into the follicle releases the hair quickly because the currents finish off the anchor. The hair releases quickly, but the lower target area is totally missed.” (c)
Michel, are these students doing insertions as in this picture?

Oops, sorry for misprint, of course I meant Michael, not Michel!
I would say so “ekade” …
Michel was my grandfather’s name from Italy! Good name!

Sorry for bothering everyone with this bulge and bulb issue again.
This article was already mentioned here, but I wanted to remind about it. It is called “The science of bulge and the bulb” by Dr. Charles Doillon. One can download it here: http://hairroute.com/subscriber/articles/bulge.pdf
As far as I understand this article, 2/3 of the follicle in anagen hair cells responsible for hair growth (bulb and bulge)
So, we need heating pattern like this:

(please, excuse my not pretty looking lines ![]()
As it is clearly seen from Dr. James Schuster photo the heat is concentrating exactly where the insulation is (1/3 lower of the follicle)

But if there will be an insulated probe, which non-insulated tip is 2/3 (or even ½) of the follicle, one can be sure that the follicle is eliminated for good no matter in anagen or telogen while inserting to the anagen depth and protecting 1/3 upper part of the follicle.

ekade, you must understand that the drawing is correct, but not exactly in proportion for illustrative purposes and no two root sheaths are the same. I do not want an exposed tip length that will do the job every time. Our goal is to make one that will have enough exposed area to do the job a majority of the time. For the longer sheaths the operator will displace and fire again. Never having to displace in a given field of hair would indicate too long a tip and treating unneeded areas at least some of the time. If we see displacement happening too often, it would mean the tip is too short.
At Laurier we are all about minimums. Not only power but also the size of the area treated. If I see an operator displacing now and then in a given area it means we have provided the correct tip length for the task.
The purpose behind the “Kelly tip” is to narrow the focus of the burst for shallow follicles and follicles in telogen. This allows the operator to more accuratly place their energy release to suit the individual follicle.
As Mr. Bono said, my father’s specifications for the tip lengths of the standard Probes are correct in most cases for an anagen hair. If we made them to cover EVERY hair we would be overtreating in a percentage of them, and irritating the patient for no reason. Some irritation is unavoidable, but our goal is to only allow that part and eliminate or at least minimize the rest.
The IBP “kill zone” diameter is controlled by the operator with the energy level they choose. It’s vertical demension is controlled by the length of the exposed tip. The operator can extend the vertical demension by displacement but the only way for them to shorten it is to step down in Probe diameter.
Ok, I understand. Thank you again for explanations and patience. 
You see now why we’ve been doing so much testing to determine the most effective length for the “Kelly” tip on the .002" IBP.
The standard .002" IBP carries a .035" long exposed tip. Good for a common anagen follicle but too long for a very shallow vellus hair. We went to .025 and the power needed to be reduced and resulted in reduced irritation. We went all the way down to .015" and that proved too far. The focus became too intense. .018" worked well but required some displacement too often. This is why we settled on .020", it keeps irritation and pain to a minimum on a sensitive lip. Used for deeper insertions it would require almost constant displacement. Effective work could still be done but with considerably more work for the operator to displace so often.
We are testing the Kelly concept on the .003" diameter IBP now. So far, it would appear .020" tip length is a bit too short ( standard is .035" like a 2 ) The jury is still out but I believe we will settle on .022" or .023" for the final size. We shall see…
Feedback for Mike
I have been using the Kelly tip 3’s. No doubt about it, I love the 3 blanks with the 2 tips as much as I love my ipad, my Apilus Platinum and animals. Much, much better feel in my hand. I do think it would be interesting to lengthen the tip to .023 or .024. I had to use displacement more than I wanted to.
I will submit pictures later. I have six hours into a severe case of vellus hair on a 23 year old and we are 94.5% to a full, first clearance on her upper and lower lip. I’m thinning the chin as well. So much hair that is perfect for your new probes.
Thank you again, Mike. Could you please write again all standard exposed tips length for all diameters?
Thank you!
P.S. It is amazing how you operate such small lengths in inches! For example, in mm one can actually visualize the length of 0.9 mm or 1.5 mm with an ordinary ruler.
I was trained as a machinist in the 1960’s and my father in the 1940’s. Elderly canines do not respond well to modern teachings  The IBP was developed in the 1960’s before the metric system arrived on these shores…
These are the standard exposed tip lengths we make. These exposed lengths remain the same no matter the overall length of the blade ( short, medium, and long )
.002" - .035"
.002" - “Kelly tip” .020"
.003" - .035"
.004" - .045"
.005" - .055"
.006" - .055"
When we have finished the determining the lengths for the Kelly 3’s 4’s and 5’s, I will place a chart on our web page that includes the metric conversions.